Quantcast
Channel: The League of Augsburg
Viewing all 1158 articles
Browse latest View live

The Other Partizan 1st September 2013 An LoA perspective

$
0
0
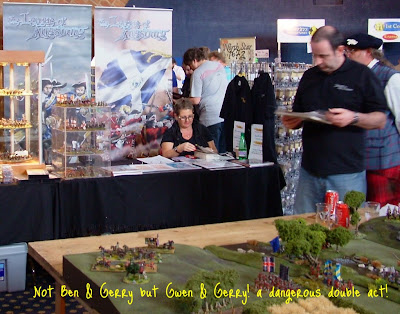
September's Partizan saw a larger than normal gathering of the clans at our traditional watering hole of the Dovecote on the A46. Thirteen of us had a rather boozy supper with relentless teasing of various victims orchestrated chiefly by David Imrie I think!  Once he's got you in his sights he shows no mercy! We all went off to the show at 0815 reinforced by one of Harry's hearty breakfasts. We had a busy set up with Toggy, Ade and Dave doing the table and Gerry, Gwen and I doing the Warfare trade stand adjacent to it.

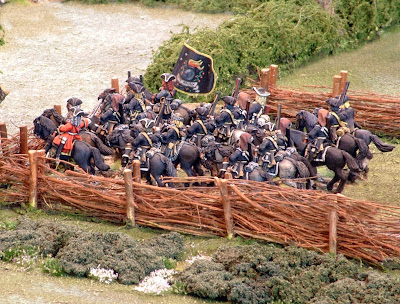
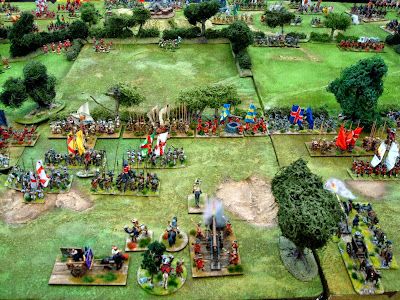
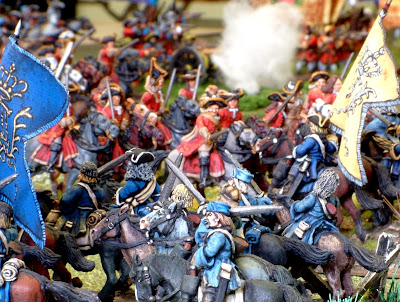
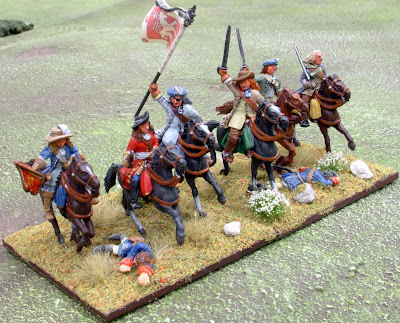
The LoA scenario was an Ireland 1691 affair on Ade's terrain with DOB, Gerry, Ade and Dave performing the honours at the table whilst I hoisted the Warfare banner with Gwen.The show appeared quieter from the get- go than May but as usual, the buzz was strong and of course we get to meet so many friends and acquaintances there.  The LoA Amigos were kept very busy during the day talking to old friends and new period enthusiasts. Although our game was not strictly speaking a historical refight it was a credible encounter battle with Williamites and Jacobites fighting over a river crossing. What struck me was how many of the Warfare Miniatures on the table were not painted by me. Bob and Dave particularly had between them about 500 models. Most of the flags were also from Quindia's super range.

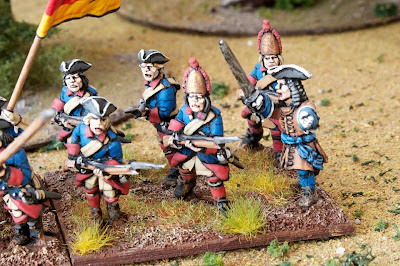
Warfare trade was steady all day and although slightly down on May it was a good overall outcome for us. We'd taken delivery that very morning of the new Gardes Francaises pikemen and the Dragoons in fur caps. We did fairly brisk trade in both. The GF command masters drew loads of attention and after the show they went directly to the casters for mastering. They should be commercially available this month. Shows appear to be a good place for flag sales and we managed to sell out of a few codes.

At the shows we carry a limited stock of Ebor battalion packs. Ironically, the trader next door to us was the only other at the event carrying Ebor!

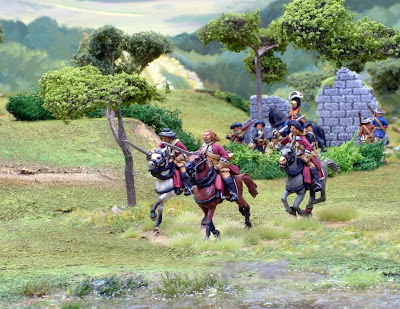
I can't comment too much on the show itself as I got away from the trade stand twice and both of those journeys were calls of nature! I had five minutes with Nick Eyre at his very attractive 1670 table and we discussed some collaborative ideas. It was great to see the 'Old Team' of Maclean - Maxwell - Cummings back together if only briefly. It just struck me when I saw them that these three patriotic Englishmen have very Scottish names! I had a quick word with Mark Allen (He has a lot to answer for as it was his articles that first got me hooked on the period), Dave Andrews and Aly Morrison and the star of our blog Dan 'no autographs please' Faulconbridge. His interview piece here is the most popular post on the blog so far.  As an aside, we'll have interviews with Henry Hyde(Editor of MW) and Nick Eyre (Proprietor of North Star) coming up over the coming weeks too.

My blogging about Partizan was delayed by a week as after the show I immediately had to drive to Heathrow and head out to Croatia for a week of work. Just back last night so here is the (late) news.
PS: Have you noticed in the pictures Gerry is always reading? But what?

“Par la bouche de mes canons” QUEBEC 1690 . Part 2

$
0
0
Barry Hilton - The territories in Canadagrew in importance to Franceover the time between first being claimed by Cartier in 1534 and the early 1620s. During this period several efforts to colonize foundered but ever increasing demands for furs from Europe thrust the difficult outpost to prominence as a gateway to potential riches for whoever owned it. Repeated attempts at settlement gradually made inroads and by the early 17th century stone fortifications were in place and the fundamentals of military and economic permanency established around what was by then being called Quebec.  It was temporarily lost by Champlain to English privateers in 1629 but returned through treaty to the French in 1632. The French were easily the most active Europeans in North America during the 16th and 17th centuries exploring and ‘claiming’ vast swathes of   land the size of Europewith less than 500 native Frenchmen insitu. There is nothing like ambition! Other Europeans were not idle during this period but the Swedes, Dutch and English had restricted their efforts to the north eastern seaboard. A process of consolidation took place between the 1630s and the 1670s with the English by far being the most energetic and it seems, prolific of the three other powers. The Dutch eclipsed the Swedes and the English the Dutch. Having been in North America in one form or another since the 1530s the French had managed to amass about 14,000 settlers by 1688 whilst the English starting almost 100 years later had accrued  a truly mind boggling 250,000 by the same date!

New England Militia - poorly armed to deal with stealth raids

English awareness of French empire building coupled with a jealousy regarding the volume of trade riches the French were ripping out of the interior fuelled hostility in the main English colonies of Massachusetts and Virginia. Perfidious Albion (at it even then) persuaded the Iroquois to conduct brutal raids around the much smaller French settlement of Montreal and war was declared in 1689 in parallel with the events in Europe. The Iroquois’ savagery so appaulled the French that vengeance had to be exacted on the real villains; The English. All of this activity coincided with the arrival in Canada of  Le Comte Frontenac for his second term as Governor General. Frontenac was a big man in all senses of the word. He was noble and of ancient lineage, an accomplished soldier, haughty in temperament but brave and symbolic of the kind of remarkable men who would carve out empires in a wilderness. He immediately sought the counsel of his professional officer corps and efficiently organised revenge on France’s traditional enemy.

In early 1690 three expertly planned raids were successfully undertaken. Schenectady,(modern New YorkState) was hit  in January, SalmonFalls, (modern New Hampshire) in March and Sasco, (modern Maine) in May. Each attack was noteworthy for its thoroughness and brutality. The French military has assembled mixed forces of French professional soldiers, volunteer militiamen and Indian allies led by Canadian officers. The three separate raiding forces operated in the ‘Canadian style’ a mixed form of warfare incorporating Indian wood craft with European discipline. Characteristics of this style were stealth, surprise, ambush and savagery on contact in other words a sort of 17th century Shock and Awe.

This was all too much for the New Englanders. Something had to be done. Money was raised entirely by the colony of Massachusetts via a paper bond scheme funded in futures those being, the booty that would be liberated from the enemy when Quebec fell. The expedition would travel by sea and the objective would be the destruction or capture or surrender or all of these, of French Canada. The obvious leader of the venture was the famous or some might say notorious Sir William Phips, a native of Massachusetts who had initially made his name as a privateer in the Caribbean. He salvaged treasure from wrecked Spanish galleons amongst other things and had recently taken the surrender of the French colonies in Nova Scotiaat that time known as Acadia. The deported inhabitants ended up in Louisianaas the ancestors of the Acadians or Cajuns without a shot being fired! His reputation was stellar although his military credentials were perhaps suspect but as we all know when the bandwagon starts to roll it’s a brave mad who’ll stand in the way. So, Phips got the job and the planning began in earnest.

For those of you like me interested in King William III’s European wars against Louis XIV, all of the above was going on around the time of the siege of Derry and the preparations for the Battleof the Boyne. Requests for regular troops from England were flatly turned down by William who cited the far more significant (well it was for him as he might get booted out of Englandand lose the throne) threat posed by James II’s Jacobite Army in Ireland. The colonists had to go it alone, a portent of thing to come. Consequently Phips land contingent was formed from 2,300 colonists organised into seven battalions named for their commanding majors; Quincy, Phillips, Hutchinson, Henchman, Appleton, Gedney and Saltonstall. All of these men were volunteers or drafted militia and in the main were from theMassachusetts colony. A few companies came from New York and the Plymouth Plantation which at that time was not part of Massachusetts. Six brass cannon manned by the Honourable Artillery of Boston accompanied the Foot. A small contingent of Indian scouts under Lt Thomas Swift was attached aping the French use of Native Americans. Overall command of the army was given to Lt General (Parkman cites Major) John Walley of Massachusetts. It is understood that the training and operating practices of the New Englanders was modeled on the Trained Bande principle and they would have therefore behaved in the same fashion as contemporary European infantry. This was in complete contrast to the tactics already demonstrated by the French during their raids of early 1690.
Phip’s fleet of thirty four ships left Bostonon August 19th which is late to begin a campaign in this period and theatre. His flag was carried by a 44 gunner the Six Friends. Including sailors the entire expedition comprised somewhere around 3,500 men, the largest military foray in North American history until the middle of the 18thcentury. Without maps it took the New Englanders till October 16thto reach Quebec. Phip’s first act upon arrival was to deliver a missive to the garrison demanding surrender within the hour! This impudence from English pirates so enraged Frontenac that he is said to have uttered the immortal and rather splendid “I will answer him (Phips) through the mouth of my cannons!” (par la bouche de mes canons) 


This unexpected retort fazed the New Englanders who resorted to an ineffectual naval bombardment for a couple of days whilst they tried to work out what to do. Storming this natural fortress, reinforced with excellent military engineering was not part of the original plan hatched in Boston. Quebec contained a formidable garrison of 900 colonial regulars (Compagnies Franches de la Marine). These men, under Navy control were trained not only in the European style but are also thought to have been organised into field battalions for offensive tactics in the Canadian terrain. A small castle guard and Governor’s bodyguard combined, provided a further 50 regulars. To supplement this excellent core 1,100 Canadian militia were also present. These men did not operate in the style of their New England adversaries but when mustered spent their time on shooting practice and woodland warfare tactics in the style of the Native Americans they lived beside. With perhaps 100 Indian allies present the French force totalled some 2,000- 2,200 men.

Faced with extremely limited options Phip’s chose to put 1,200 men ashore on 18thOctober in an attempt to come upon the city from the landward side. The north eastern approach had been identified as the weakest. A point called La Canardiere on the Beauport shore, east of the St CharlesRiver was where unopposed, John Walley landed his men. Walley had to get his little army across firstly the BeauportRiverand then the St CharlesRiver before he could attack the enemy defences guarding the city approaches. Frontenac had lined the banks of the St Charleswith earthworks and was poised to reinforce the position with three battalions of his regulars. In advance of this location he placed militiamen and Indian marksmen led by regular officers. These advanced picquets immediately began to harass the close order New England battalions forming up before entering the woods. This one sided cat and mouse affair continued for two days.

To cover his land manoeuvres Phip’s had moved the fleet inshore to provide a bombardment of Quebec. The garrison responded so effectively with counter battery fire that many ships were damaged, Phip’s flagship was allegedly dismasted and troops from the garrison paddled out in canoes and scooped his personal standard from the river as trophy. Nothing was going the New Englander’s way.

On the 20thWalley decided to force a crossing of the St Charles and storm the earthworks beyond. They formed up in the European style and advanced into the hungry muskets of the woodsmen and Indians. Despite bringing up half a dozen brass cannon they could not force their way into the woods and eventually retreated to their boats on the evening of the 21st abandoning most of their guns. It is thought up to 15% of Walley’s force was lost in the abortive attacks whilst French loses were no more than 60 killed or wounded. Phip’s fleet ignominiously sailed for home on the 23rd experiencing many more hardships and loses on the way. So ended the first Anglo Saxon attempt to seize French Canada.

FEATURED REGIMENT: Montcashel's Regiment

$
0
0
Barry Hilton - When I began playing in the Grand Alliance period and heard about the 'Wild Geese' I was captivated by the story. I had never made the connection between the title of the movie starring Moore, Harris and Burton and the fabled exploits of Ireland's exiled soldiers in the service of France. That was in spite of the fact that Moore's character is called Shaun Fynn and Harris being of course, an Irishman!
My friend of the time had Regiment Claire in his collection so I chose Montcashel's. Justin McCarthy, Lord Montcashel can be read about elsewhere in the blog (you'll find him featured prominently in the series  In the shadow of history). Active early in the war in Ireland, Montcashel's Regiment were one of the battalions exchanged into the service of France in return for seven French battalions shipped to Ireland to brace the Jacobite Army. Their real story is that of the Irish Brigade in French service who fought with distinction and in one form or another were present in Napoleon's Army over 100 years later. The Wild Geese who flew away from home never to return to Ireland.
I first painted the regiment in 1992. They were one of the few units composed mainly of Foundry models which I had at that time. I rebased and gave them new colours sometime around 1996 during the collection's major overhaul. During that refresh I made their coats much more vivid red and brightened the green of their facings. This was around the time when I switched from 40mm square flags to 50mm square. The flags on this version of the regiment I was particularly pleased with as they illustrate well the 'free hand on cotton' method which I developed over many years of practice and regrettably have little time to pursue these days.
Their service record in my collection is impressive. They fought 64 actions achieving eight distinctions. Their average battle losses  were a heavy duty 31%. The fighting Irish captured the colours of Kirke's Lambs on one notable day and they lost their own colours  three times in their career.
Their finest hour came in a refight of the battle which never was from the War of the Spanish Succession: Overjise 1703. We fought this game in Burnley in 1994. The Irish Brigade saved the French right flank from an attack by 4,000 grenadiers which appeared through the woods after a risky enveloping manoeuvre.

Their darkest hour was an ignominious surrender at Kilbride (my home town in Scotland) during a  fictitious scenario set in 1689. They gave up without a fight to Lennox's Regiment of Horse, a volunteer unit.
Regrettably during a 2010 reorganization of my collection I broke up Montcashel's Regiment, cannibalising parts to fill gaps in other formations. I still have most of the models now recruited into a less distinguishable Jacobite infantry formation which has made several appearances in League of Augsburg weekend games.
I painted the regiment again for Julian Blakeney Edwards. This iteration used Old Glory models and was dressed in tricornes for the WSS period. I think Julian has since sold them on. They were completed around 2003-2004.
  

BATTLE PHOTO FEATURE: WALCOURT 1689

$
0
0
Dutch Dragoons advance against the French

Barry Hilton - I took a car journey to Walcourt about 7 years ago and was very surprised by the terrain in the area. Walcourt is near Charleroi in south Belgium and the approach from the north was through a deep gorge as far as I can remember. I couldn't reconcile the terrain with things I had read about the battle. The town is built on a slope climbing out of the gorge towards a plateau to the south of the town. This is where I believe the action took place.

Dutch and French infantry clash near the church

Here are some pictures of the Walcourt game we displayed at Partizan in 2010 or 2011(can't quite remember when). The game also featured heavily in Warlord's Pike & Shot supplement to Black Powder. We ran it again at John Stallard's house and I took plenty of shots some of which we present here for your pleasure.


Our game was representational and not a truly accurate recreation of the battle. For those unfamiliar with Walcourt it stands out as the only Allied victory in Flanders of any significance until Namur fell in 1695. British infantry distinguished itself in an evolving battle which had several distinct phases.


Almost all of the units are from my own collection as at this phase in the LoA development Bob, Dave, Adrian and others were just beginning to turn out significant numbers of figures. There are a mix of Dixon, Foundry, Essex, Reiver and a few Stratagem models with Warfare Miniatures regiments beginning to creep in here and there.


I was very pleased with the way these shots came out. They are only 'posed' to a minimal extent and most were take during the actual game at John's house or at Partizan in the grimly and dimly lit main hall of the Kelham venue.


“Par la bouche de mes canons” QUEBEC 1690. Part 3

$
0
0
Orders of Battle and Unit Composition
The New Englanders
Phip’s had 2,300 militiamen in seven battalions. A simple division gives an average of roughly 330 men per battalion. This figure is roughly half the size of an actual regular army battalion’s strength during the period. It may be safe to assume that colonial militia units were severely under strength for a variety of reasons. As this was not a Royal or State initiated campaign then perhaps enforcement of service terms may have been rather less stringent than a national war situation. If the militia followed the traditional infantry structure then these 330 man units would be subdivided into 13 companies. Company strength would then be a meagre 25 men.
It has been stated that the New England militia were organised on the Trained Band system. This would mean a ratio of two muskets to one pike. Units could then be composed of two wings of muskets and a central group of pikemen.
Massachusetts men. The French may have looked different.

The French
Chartrand mentions Frontenac reinforcing the St CharlesRiverdefences with three battalions of regulars. If one assumes that he was prepared to commit all of his regulars to this forward defence then each battalion could be roughly 300 men strong. This is however a big assumption. An experienced soldier like Frontenac would be unlikely to leave the important job of garrisoning the city to militia and it would be a logical conclusion that he would have distributed regulars to other key points of his defence. A figure of 300 French per battalion is in my opinion too generous. If Frontenac held back one third of his regulars in reserve or distributed across other locations then his three battalions at the St Charles may have been  150 -200 men in strength. The use of the word ‘battalion’ is misleading and may refer to a tactical formation as opposed to indicating strength. There are no mentions of the French deploying pikes in Canada. This means that all of their regulars and militia would be armed with muskets. Whether all of their Indian allies had muskets is a moot point. All of the above information forces some decisions in terms of organisation for the scenarios.

“Par la bouche de mes canons” QUEBEC 1690. Part 5

$
0
0
The New Englanders didn’t get very far in real life. To add to the interest I have written one scenario covering the actual events and two further scenarios using the popular ‘What if’ principle. These give the Colonists a chance to achieve the bigger prize of winning Quebecfor their King and the booty. The figure to man ratio I have used for the orbats is 1:10 which means a standard unit of militia could be made up of four musket stands and two pike stands. Players can adapt the scenarios to suit individual collections.

SCENARIO 1 (HISTORICAL) – Walley’s advance to the St Charles
John Walley leads his New Englanders through the woods and on towards the St CharlesRiverand its line of defended breastworks. In his path are many small groups of wily Canadian militia and Indians. They are intent on throwing back the English attack without engaging in close combat. Walley must get his force to the east bank of the St Charlesin order to form up for the crossing and assault. 

Order of battle for the New Englanders  (John Walley – rated Average)
Four battalions of New England Militia
Three light guns
Two minor leader models

Order of battle for the French (Captaine Montmorency)
Eighteen Canadian militia in three groups of six models (each group subdivided into 2 x 3 models)
Six Indians in one group (subdivided into 2 x 3 models)
Two minor leader models (one may be an Indian chief who must remain with his warriors)
Two battalions of Compagnies Franches de la Marine (each comprising of two stands of six models each)

Deployment
The New Englanders deploy as shown on Map One. The French player may then place his militia and indians anywhere in the woods. One of the units of Compagnies Franches de la Marine will arrive on the eastern table edge at the beginning of turn five. The point of arrival is secretly marked on a map before the game begins by the French player. He must also specify at the same time whether the unit will appear in close or open order. Until it is within visibility distance of the New Englanders it can be marked with a counter. An additional ‘Bluff’ or blank counter can be moved simultaneously from another eastern table edge location to simulate fog of war. When the genuine unit engages the Bluff marker is removed. The second unit of French regulars will appear after the French player has accrued a score of 13. After the arrival of the first regular unit on turn five the French player rolls a D6 every turn. He carries a running total of this score. When it reaches 13 then the unit appears. Number the six one foot long sections of table edge 1-6 and throw a D6. The corresponding score refers to the section on table edge at which this unit arrives. The minor leader models can all be on table as the game begins.
Objectives
Walley must get at least half of his infantry to the eastern table edge to win. These must have good morale but will of course be disordered for being in the woods. The French must prevent this to win. There is no turn limit.

Beneath the Lily Banners Gaming Weekender 12/13 October

$
0
0
We are just about to embark on our latest BLB gaming weekender in Derby, England. The format for this season's action differs from that used on previous events. Where, in the past we have run one huge game over two days, this time we are going to provide players with as broad a taste of the period 1690 - 1720 as possible.
Danes face Swiss and French at Derby

We are using four distinct theatres: Scotland 1689, Ireland 1691, Flanders 1693 and Lithuania 1703. Each game pits quite different armies against each other in a historical context. In Scotland the Jacobites will face a Williamite force. In Ireland the old King's Army will face the new King's Army. In Flanders Marshal Luxembourg will face William III and in Lithuania the Swedes will meet August the Strong of Poland-Saxony.

I don't want to give too much away but players will rotate through each theatre partnering with and facing different opponents each time. Some of my treasured units are coming out of retirement for this gig so the camera will be clicking furiously over the full two days of gaming.

We are even going to have some 'non production' Warfare Miniatures gracing the table and I'll do a short feature on that later this week too.

There will be 16 of us for the mayhem and we'll report it all right here afterwards including features on the scenarios, winners, losers and action!

FEATURED REGIMENT: Jönköpings Regiment

$
0
0
Bart Vetters - When I started my Great Northern War Swedish collection, I decided to initially paint up (at least one battalion of) each of the five regiments that ended up with General Roos seperated from the main force. I did not know it a the time, but the Dal regiment was the only one of those five regiments to look like what everyone pictures in their mind when talking about Swedish infantry: blue and yellow. All of the other regiments that ended up with Roos for some reason or other have 'non standard coloured' uniforms. The subject of  today's post is no different:

The Jönköpings regiment. They still look like Swedes, but funnily coloured ones. All figures are Musketeer except for the officer on the extreme right of the picture, who is a Foundry Marlburian figure. The flags and tassels are from Little Big Man Studios. All painting by the author.
The Jönköpings regiment, as were most of the units in Karl's main army, were indelta infantry. As the name suggests, they were raised in the town and county of Jönköping, located in south central Sweden at the bottom of Lake Vättern. As today, Jönköping County is a populous area so they could raise a regiment as a county where normally an entire province did so. The province in question was so populous, in fact, that a second county in it, Kronoberg County, also raised a regiment. There was talk in the 17th century of amalgamating both regiments into a Smaland infantry regiment, but this never came to pass.

The Jönköpings regiment started the Great Northern War in Sweden's North German posession of Pomerania and participating in the Holstein campaign in 1700. In 1702, it went to Poland to join the King's Army (which had arrived there from its victorious campaign in Russia) and remained with it until its surrender at Poltava. After Poltava, the Jönköpings regiment was reraised, fought in Skane and was then sent to Germany again, where it ended it second life at Stralsund when that city surrendered to the Allies in 1715. The regiment was then raised a final time to participate in the abortive 1718 Norwegian campaign.
A close up of the unit to illustrate the difficulties often encountered when mixing figures from different manufacturers. The officer waving his troops forward is a Foundry Marlburian figure - that entire line of figures is significantly less hefty than the Musketeer miniatures that make up the rest of the unit. It is not obvious from this angle, but the Foundry figure is raised up from the base by means of three washers, the edge of one of which is just barely visible through the ground work by the figure's left foot. Using basing tricks like this, it is possible to mix the different makes of figures.
In the battle of Poltava, the Jönköpings regiment - which was down to a single battalion in strength by then - started out as the rear unit in the column of General Sparre on the extreme left of the advance through the redoubts. In the confusion of night and unclear orders, the Jönköpings and the regiment in front of it (Närke-Värmlands) somehow veered of to the right and got implicated in General Roos' attacks on various redoubts. They stayed with Roos throughout the rest of the battle, being chased away from the main infantry advance and eventually ending up surrendering in sight of Poltava itself. They did not see action in the main fight later that day.

The uniforms of the Jönköpings regiment are the basic blue Swedish coat with red facings, leather vests and breeches and red stockings. In 1700 the unit had red lined Karpus, but these were replaced by white braided hats in 1702, so I have opted for the latter to represent the unit as at Poltava. There is no information on the grenadiers' headwear, so I have given them the iconical mitres.

The Controversy of Defeat - The Collapse of the Jacobite Left Wing at the Battle of Aughrim, July 12th, 1691 - Part Three

$
0
0
Michael McNally - Over the intervening centuries commentators have spilt an effusion of ink in discussing both St. Ruth’s conduct during the siege of Athlone and setting forth a number of theories that would presuppose that his subsequent desire to fight a pitched battle was based upon a fit of pique rather than any strategic consideration. 


Athlone, like many Irish towns was effectively two settlements, in this case divided by the waters of the River Shannon. To the east, and built on the higher right bank lay the ‘English Town’, an area of relatively modern construction bounded by a trace of stone walls which St. Ruth’s engineers has spent several months strengthening and reinforcing against the inevitable bombardment by enemy. These defences, however, were a paper tiger as, had St. Ruth even have wanted to deploy there in strength, they could only accommodate a small number of troops and once the town was invested by enemy forces the Shannon would make further reinforcement of this eastern bastion both difficult and dangerous. 
 

On the left or eastern bank lay the original settlement – ‘Irish Town’ – which, with the exception of King John’s castle, a mediaeval stone built structure, relied primarily upon a combination of the river and an earthen embankment for her defence. It was here that St. Ruth planned to mount his main defence, drawing the enemy on to blood himself against the defence works, to waste time, manpower and, above all, ammunition in a fruitless struggle to force the passage of the river. Similar to the situation in ‘English Town’, the left bank settlement could only hold a certain number of troops before these numbers would have a detrimental effect on a credible defence, and so St. Ruth elected to encamp a short distance from Athlone with the main body of his troops, whilst the garrison units would be slowly rotated throughout the army, theoretically allowing the men to gain experience by a measured exposure to enemy fire without compromising the defence of the town itself.


As anticipated, the siege of Athlone followed established procedures with the Williamite troops storming ‘English Town’ after a sustained bombardment and then drawing up short as the Jacobite defenders destroyed the main bridge and prevented any further exploitation. With his attack stalled, Ginkel redeployed his forces and began to establish a number of artillery positions from which he could fire upon ‘Irish Town’ and thus weaken the defences whilst he and his subordinate generals began to plan an assault to carry the town. Eventually, and after several days’ artillery bombardment during which much of the defences had been reduced to rubble, all was ready and soon a column of picked troops was fording the Shannon whilst below Athlone, Williamite engineers also swung a pontoon bridge across the river in order to facilitate the passage of cavalry. 
 

In the interim, St. Ruth had not remained idle, relieving and reinforcing the town’s garrison as and when possible but his ability to do so was severely compromised when the Williamites constructed a battery of heavy artillery whose sole purpose was to interdict the movement of troops between the Jacobite camp and the town. At this stage the fate of Athlone lay in the lap of the gods and whilst they initially held off the enemy assault, one of the inherent faults in the Jacobite army came to the fore when a number of senior regimental officers were either killed or incapacitated during the fierce combat.


Given Ireland’s unique cultural make-up, many of the regiments that had been raised in the predominantly Gaelic west had effectively been formed on feudal lines with the magnates becoming regimental colonels and parcelling out the various commissions to family and relatives whilst their dependants and retainers formed the regimental rank and file. Thus it was that when Colonel Art McMahon fell at the head of his men, they had not only lost their commanding officer but also their clan chief and such a loss could not be filled quickly, especially not in the vagaries of hand to hand combat.


Aware of the deteriorating position within the town and braving the Williamite artillery fire, St. Ruth ordered the main body of the army forward to reinforce the garrison and throw back the enemy assault columns, but within Athlone the defenders were slowly but surely giving ground in the face of increasing enemy pressure and eventually broke. After a half hearted attempt to assault the town from the west, St. Ruth soon accepted that an ill-prepared attack would only result in failure and an unacceptable loss of men marshalled his forces together and, turning west, marched them toward Ballinasloe on the River Suck.


It was inevitable that, following his death at Aughrim, St. Ruth’s conduct throughout the campaign would be the subject of great scrutiny. For modern historians, it is an attempt to piece together the manoeuvres of that fateful summer, but for many of his contemporaries it was an ideal opportunity to ‘kick the dead lion’ and somehow excuse their own actions. One case in point is a report from one of the French engineers attached to the army who suggested that a large section of the westward facing defences could be dismantled in order to facilitate that transfer of troops from the army camp into Athlone, and vice-versa. That St. Ruth failed to act upon this suggestion and the fact that when the garrison broke, these selfsame defences effectively prevented any relief or counterattack by the main army is one of the charges laid against him. But what is invariably never taken into account is the fact that the Jacobite commander was acutely aware of the enemy’s superior mobility and ability to cross the Shannon both north and south of the town, and thus had he have razed a significant section of the earthen ramparts, it would most likely have compromised the garrison’s own ability to defend the town. 
 

Although the defence of Athlone could be seen as a vindication of St. Ruth’s tactic of inviting the enemy to waste men and resources in attacking prepared positions, it soon became clear to many of his peers that the price of such success was a loss of space in which to manoeuvre. Just as it was clear that Ballinasloe was indefensible, it was also clear that, if the Jacobite forces were not to completely surrender the initiative to the enemy, a suitable position would have to be found which would negate the Williamite advantages of numbers and superior equipment, and as the army continued westwards it seemed that such a position had indeed been found – the ridgeline of Kilcommodan Hill to the south of the small village of Aughrim.

We would like to thank Michael McNally for contributing to the League of Augsburg blog as a guest author. Most of our readers will recognize Mike as the author of Osprey's The Battle of the Boyne 1690: The Irish Campaign for the English Crown and The Battle of Aughrim 1691. Mike has other Osprey titles in other periods as well, but will have another title in the League of Augsburg period next year in October 2014... Ramilies 1706: Marlborough's Tactical Masterpiece from Osprey Publishing. All text in The Controversy of Defeat series is Copyright 2013 Michael McNally and used with kind permission. 

Pre or Early GNW Swedes Warfare Miniatures

$
0
0

Barry Hilton - I'm into BLUE these days. Not hugely layered and highlighted shades of blue but dense, flat, slap you in the mush sort of BLUE. It is a technique I have seen used before by people in the hobby I respect very much such as Dave Andrews. Make the primary uniform colour of the model flat and dense. Contrast everything else against that mass. I think the effect is very pleasing.


With the emergence of my venerable Swedes from retirement for a rare table top appearance at LOA DERBY 12/13 Nov 2013 I faced a perplexing problem. I rummaged through more than 40 box files looking for three missing battalions... Dal 1, Dal 2 and Ostergotland. Could I find 'em?... only after over two hours of fruitless searching did I realise why I couldn't find them.. I sold them last year!!!

What a t***!


So, I had rostered 7 Swedish battalions but in fact possessed only 4 serviceable. So I set myself a bit of a task.. finish one (6 models) and paint another from scratch (25 models) in a week whilst also organizing the scenarios for the weekend, cleaning out my mother's house, doing my day job and trying to keep fit... yup, typical week for yours truly.


Anyway, the task was made easier by the motivation of watching my DEEP BLUE chaps take shape. I resisted the temptation to paint my residual Musketeer Miniatures and decided to complete a unit which could be used in the NYW as Lowenhaupt's or Oxenstierna's in Dutch service.


I didn't have time to do flags from scratch and I knew these boys would have their first outing against Gunter Heim's Saxons so I use the Uppland flag designed by Clarence. It fits rather nicely I think and I may just leave it in place when the blonde boys take the field in Flanders pre 1697.


You may be interested in the little explosion scene happening on the central base (more of that in a series I am writing for the blog now on Story telling with model soldier vignettes). The explosion.. mortar shell? grenade? is made from steel wool suitably worked up.

The falling chap next to the colonel's colour is another Warfare mini which I have never put on commercial release. I have a few lying around. He was designed with the casualty pack but dropped we only wanted to use five from six.


Lots going on here. I like the look of the unit. One more innovation is the slightly smaller pike base gone from 60 x 60mm to 60 x 40mm. Gives us back a little table space!

“Par la bouche de mes canons” QUEBEC 1690. Part 6

$
0
0
SCENARIO 2 (WHAT IF) Assaulting the Breastworks
Walley has succeeded in reaching the western shore of the St Charles with the majority of his force. He must now carry the breastworks defended by soldiers of Le Compagnies Franches de la Marine. He has lost many men fighting through the woods and his gunners are finding it very difficult to drag their pieces through the dense undergrowth.

Order of battle for the New Englanders (John Walley – rated Average)
Three battalions of New England Militia on the western shore of the St CharlesRiver
One battalion and one light gun on the eastern shore of the St CharlesRiver
Two minor leader models

Order of battle for the French (Captaine Montmorency)
Six Canadian militia in one group (subdivided into 2 x 3 models)
Six Indians in one group (subdivided into 2 x 3 models)
Two minor leader models (one may be an Indian chief who must remain with his warriors)
Two battalions of Compagnies Franches de la Marine (each comprising of two stands of six models each)
One light gun

Deployment
The New Englanders and French regulars deploy as shown on Map Two. The French player may then place his militia and Indians anywhere in the woods. 
Objectives
Walley must get his men over the French breastworks. The French must prevent this to win. There is no turn limit.

Special scenario conditions
Walley has a single battalion remaining on the eastern shore at the start of the game. He must accrue a score of 13 to get it across the river to support his attack. From turn two he rolls a D6 every turn. He carries a running total of this score. When it reaches 13 then the unit crosses and forms up in line on the following turn when it can then move off.

The breastworks count as hard cover. If the New Englanders succeed in getting over the breastworks with a single battalion the French units all take a morale test at the end of that turn at a -2 modifier. This even applies to French units in melee who are winning. This simulates the psychological effect of the enemy achieving an extremely tough set of objectives and the morale ascendency this would create for Walley’s embattled command.

DERBY DEBRIEF... A Weekend of BLB

$
0
0
The blooding of Günter's Saxon Army against Karl XII's Swedes 

Barry Hilton - Well, our Derby adventure is over for another year and we finished off 2013 in style with a new format featuring 4 separate tables through which the players worked their way over two days. The idea was something we'd used in our League of Gentlemen games for WW2 and Vietnam. The principle is to allow the maximum amount of variety for each player over the two days with four chances to win and partner new people every session.

It seemed to go down very well with the players who entered into the spirit of the game(s) and worked in teams with great enthusiasm.

To give as broad a flavour of the period and allow BLB to breathe in different situations I set the games in four theatres and at slightly different dates between 1689 and 1703.

Ramsay's men brace for yet another Highland charge

Date: July 1689: In the Central Highlands of Scotland General Hugh Mackay of Scourie took his small army out to hunt down and destroy the forces of Bonnie Dundee. They meet in a steep sided glen and four times replayed their encounter.

Williamite guns watch over Athlone 1691

Date: July 1691: Central Ireland: General Ginkel has Athlone under siege. The town is about to fall to King William's Army... through the dawn mist the thunder of an army on the march can be heard and the Williamite Army stirs from its slumber. Patrick Sarsfield has arrived leading a relieving force which bears down on the besiegers like ravenous wolves.

Maison du Roi attack the Allied rearguard at Neerhespen

Date: 29th July 1693: King William's army is shattered and the Maison du Roi have cracked his line. In the panicky retreat the entire army is heading for a tiny bridge over the Geete. A rearguard begins to form to protect the valuable artillery train and the possessions and mistresses of numerous general officers. Will they be able to hold back the waves of French cavalry pursuing them?

Drabants mix it with Saxon Kurassier

Date: July 8 1702: In Lithuania Karl XII of Sweden faces a Saxon army over twice the size of his own. He must attack over a marshy stream and break the massive enemy army commanded by the King of Poland- Saxony August the Strong.

Liberty from tyranny? Who said that? Athlone 1691

Most of our 13 players managed to play on every table commanding a different army each time. This taster allows us to share an overview with Blog members with the promise that we will revisit every scenario in detail, show lots more pictures and explain how each game went. Each was played four times and we got a variety of results. In the meantime, enjoy this little treat with photos of units from the collections of Adam Hayes, Colin Napier, Adrian Howe, Gerry Donohoe, Jim Masson, Bob Talbot, Gunter Heim and myself. Additional painting by Andy Thomson, Peter McCarroll, Tam Nish, David Imrie and Alan Wedderburn.

The Controversy of Defeat - The Collapse of the Jacobite Left Wing at the Battle of Aughrim, July 12th, 1691 - Part Four

$
0
0
Michael McNally - For St. Ruth it did indeed seem that the area around Kilcommodan Hill south of the small village of Aughrim was indeed a sign of Divine Favour – bounded to the south by the Tristaun Stream and to the north by a narrow causeway that traversed the waterlogged Melehan valley, the position was seemingly perfect for the Jacobites to deploy on the higher ground and invite attack. In addition to this, the slopes of Kilcommodan were criss-crossed by a network of dense hedgerows which provided a natural breastwork to shelter the Jacobite troops from enemy fire. As if to reinforce the suitability of St. Ruth’s position and in order both to mitigate their own losses and reduce the achievement of the Irish troops a number of Williamite commentators would later choose to depict the summit of the hill as a series of carefully constructed ambush points riddled with trenches and whilst this has, to some degree, gained currency in recent times, the plain fact is that whilst they certainly had the manpower present, St. Ruth’s army did not have sufficient tools with it to conduct such an extensive feat of field engineering. That the position was improved is clear, but it would have more than likely have been as an integration of the natural terrain features rather than any major construction. Like his adversary, St. Ruth not only had to also resupply his army, which took time, but he had no real way of knowing how fast van Ginkel would move off in pursuit from Athlone. In short his troops needed to be in position, ready to meet the inevitable enemy attack as soon as was possible – The key to the whole position was a close deployment which would prevent the enemy forces from gaining passage in any of the battlefield sectors, and thus St. Ruth couldn’t afford to have his troops dispersed when the enemy columns could come into sight at any moment. 

The Jacobite center at the Battle of Aughrim as portrayed by the gang at Claymore 2013

As if to reinforce this, rumours began to circulate that even before the fall of Athlone St. Ruth had already chosen Kilcommodan as the potential site for a defensive battle but, whatever the truth of this the fact is that Aughrim was the last possible area where he could engage the enemy without compromising the Jacobite war effort, for it was here that the Western Road divided, with one fork heading towards Galway whilst the other led towards Limerick. If St. Ruth were therefore to refuse battle at Aughrim he would be forced to either commit the cardinal military sin of dividing his forces in the face of the enemy or uncover one or both of the two major Irish ports that remained in Jacobite hands, an act that would in fact spell catastrophe for the Stuart cause.


Unlike the Williamite army at Aughrim whose composition and deployment are a matter of documented fact, aside from a number of letters sent to Versailles by the French commissary, Fumeron, or the contemporary manuscript often referred to as ‘A Light to the Blind’ which was re-edited by Sir John Gilbert in 1892, there is little concrete information available on the Jacobite army and much is the subject of speculation or guesswork.
 

From the sources available to us, we can tell that St. Ruth placed his troops in a fairly conventional manner: his centre consisting of two divisions of infantry, commanded by major generals William Dorrington and John Hamilton whilst each of the two flanks was covered by a mixture of mounted and dismounted troops, the left based around Aughrim village and the right anchored upon Attibrassil and the Tristaun Stream, the two being commanded by major generals Dominic Sheldon and Patrick Sarsfield respectively. 
 

With the army thus deployed, St. Ruth sat down to await the enemy, whose advance elements began to arrive on Urraghry Hill, on the opposite side of the Melehan valley late on the morning of 12 July, deploying straight from their order of march into line of battle.


For a modern analysis of the battle I would recommend the author’s “1691 – The Battle of Aughrim”, but a rough sequence of events is as follows:

  1. Van Ginkel orders an attack upon the Jacobite Right flank around Attibrassil with the twin aims of turning the flank and forcing St. Ruth to commit his reserve troops early in the battle. Ultimately as both sides commit additional troops – which includes the Jacobites withdrawing the garrison of Aughrim village and committing it to the battle line – the fighting degenerates into a stalemate with the Jacobites holding a slight advantage in that their line remains intact.
  2. Seeing his first attack falter, the Williamite commander then orders his centre to attack across the valley of the Melehan. Under fire from the Jacobites, many of the troops reach the base of Kilcommodan Hill but as they continue to advance, the Jacobites launch a counterattack which throws the majority of the attacking regiments back in disorder. The exception to this is a force of four battalions under Colonel Henry Rowe who take shelter in a cornfield adjacent to the Causeway but who, once there, are unable to leave the protection that it offers.
  3. The Jacobite counterattack reaches the Williamite start lines, but is itself then forced back when attacked by the Williamite second line.
  4. By late afternoon, seemingly unable to break the Jacobite line, van Ginkel considers calling off the attack in preparation for a renewed assault on Kilcommodan the following morning, but is persuaded by Major General Hugh Mackay to launch an attack across the Causeway with the cavalry of the Williamite right wing. Seeing the enemy beginning to move St. Ruth leads the two squadrons of King James’ Lifeguards to reinforce the left flank, but after pausing to re-site some cannon, he is killed by enemy artillery fire and thus, at the most crucial phase of the battle, the Jacobites are literally leaderless.
  5. Mackay launches his attack and in the face of the advancing enemy, the Jacobite front line pulls back and ultimately withdraws from the battlefield, shortly to be followed by the heavy cavalry.
  6. Reorganizing his forces under largely ineffective enemy fire, Mackay directs his troopers into the open left flank of Dorrington’s division, thus catching the infantrymen in the open and inflicting heavy casualties.
  7. De Tessé is badly wounded leading a Jacobite counterattack. He is succeeded by Patrick Sarsfield who manages to conduct a fighting withdrawal and salvages much of the Jacobite army, although a critical amount of arms and equipment is left on the battlefield. Once the threat of enemy pursuit subsides, acrimony begins to spread throughout the army firstly against St. Ruth and then against the commanders of the left wing with Henry Luttrell rather than his superior, Dominic Sheldon being particularly singled out for opprobrium.
We would like to thank Michael McNally for contributing to the League of Augsburg blog as a guest author. Most of our readers will recognize Mike as the author of Osprey's The Battle of the Boyne 1690: The Irish Campaign for the English Crown and The Battle of Aughrim 1691. Mike has other Osprey titles in other periods as well, but will have another title in the League of Augsburg period next year in October 2014... Ramilies 1706: Marlborough's Tactical Masterpiece from Osprey Publishing. All text in The Controversy of Defeat series is Copyright 2013 Michael McNally and used with kind permission. 
 

Warfare Miniatures at Crisis 2013

$
0
0
Barry Hilton - I will be trading as WARFARE MINIATURES at the show and demoing a game for Donnybrook based around the Bokkenrijders.. just to add a little bit of local colour 8) 

Anyone going to the show who pre-orders books, figures, shirts or flags with us before the show will get a 10% discount and can pick up on the day!

“Par la bouche de mes canons” QUEBEC 1690. Part 7

$
0
0
SCENARIO 3 (WHAT IF) Open battle – the great men meet!
Phips has persevered with his harassment of the Quebecgarrison. Frontenac, tiring of the skulking hit and run warfare practiced by his irregular troops has decided to give battle on an open forest grove to the east of Quebec. His troops are outnumbered but he feels confident of overcoming the rag tag rabble of the English Pirate Phips.
Frontenac - French hero and legend!

Order of battle for the New Englanders (Sir William Phips – rated Average)
Seven battalions of New England Militia
Four light guns
Six Indians in one group (subdivided into 2 x 3 models)
Four minor leader models (one may be an Indian chief who must remain with his warriors)

Order of battle for the French (Le Comte de Frontenac – rated Inspirational)
Four battalions of Compagnies Franches de la Marine (each comprising of two stands of six models each)
Three light guns
Sixty Canadian militia in ten groups of six models (each group subdivided into 2 x 3 models)
Six Indians in one group (subdivided into 2 x 3 models)
Four minor leader models (one may be an Indian chief who must remain with his warriors)

Deployment
As shown in Map

Objectives
To vanquish the enemy and secure the City of Quebecfor King and Country.
Special scenario conditions
Phip’s Indians operate as explained in the article for Frontenac’s tribesmen.

Uniforms
The Compagnies Franches de la Marine were from 1680 uniformed in grey-white lined blue with blue cuffs, vest, trousers, stockings and brass buttons. The source for this data is http://www.besner.org/1-10-The.Comp.Franche.html. The Militia of New England appear to have worn standard European type clothes and carried similar equipment to their contemporaries in the Old World. At http://www.military-historians.org/company/plates/images/US.htm#za plate of Governor Phip’s Expedition shows men in coats of brown, taupe and red with the standard felt and what looks like fur, hats. There are a series of three Osprey books on American Colonial Troops (#366, #372 & #383). These do have information, prints and plates from the period but I have never been able to get my hands on the books or see them at the usual stockists on the show circuit.

Figures
In 28mm, my preferred scale, the choice of figures is much wider than ever before. For the New Englanders the Grand Alliance/Monmouth Rebellion range from Dixons would be ideal. There are now figures from Reiver Castings. Some of Foundry’s earlier Marlburian range could also be used. Many of  the Warfare Miniatures range could be used with some of the characterful Cuirassier officers guising as minor leaders and the big personalities like Phips and Frontenac.  Any of these could be used for the French regulars. French militia are a little more tricky. Some late ECW or TYW types in ragged clothes may do as may some of the more simply dressed figures from the ranges above. At a pinch later French Courier du Bois or even bonneted pirate figures could be deployed. The Indians can be picked up from a wide variety of sources.

DERBY DEBRIEF: Klissow, July 8, 1702

$
0
0
Klissow: Swedes on the left and Saxons on the right

Barry Hilton - This game was a scaled down version of the battle of Klissow, July 8, 1702. I dug my Swedes out of retirement for this one and literally has to give them a clean with a very fine sable brush to remove a layer of dust accumulated over years in box files and lying around my garage.

I misplaced three regiments (misplaced is an inaccuracy, I actually sold them to Günter and forgot that I did so!). Having spent a fruitless 2 hours looking for them before I remembered  I no longer owned them. This gap meant I needed to do a bit of quick painting to get the Swedes back to some kind of strength. Regiments Halsinge and Uppland were the output of a week's painting pre-Derby.

The Klissow table was 10 x 6 and fairly plain and dominated by a marshy area running across 8 feet of frontage between the two armies. We used a neat rule to create unpredictable movement for anyone moving into this area; Each unit threw a D6 every turn  they were in the  terrain. On an even number score they were unaffected by the ground. On an odd number score they then threw a DAv. The resultant number of inches was subtracted from their movement in that turn. That made the Swedish advance very difficult to coordinate and unpredictable. Another variable was the effect of Günter's massive quantities of chevaux de frise.


Günter jokingly (I think) brought out about 10 miles of the stuff and insisted that no Saxon infantry unit would deploy without it. He then 'encouraged' me to create a rule to accommodate the work of his sculptor! Liking a challenge, I did just that on Friday night as I counted sheep.

Here is the rule: When a Swedish unit charged a Saxon unit the defender throws a D6. On an odd number score the chevaux were ineffectually placed and provided no significant impediment to the Swedes. On an even score the Saxons then threw a further D3. The resultant score was the number of additional combat dice they were allowed EACH turn of close combat. This worked very well being uncertain and variable if the defences were good.

The Saxon Army was composed of 16 infantry battalions, 25 squadrons of cuirassiers and 3 field guns. The Saxon infantry were in 4 brigades each of 2 regiments of 2 battalions. The first battalions were all classed as Drilled and the second all Raw. The Cuirassiers were half Drilled, half Raw with the exception of the 4 squadron Gardes du Corps graded as Elite. In the last run of the game we upgraded all of the remaining Saxon cuirassiers to Drilled with the exception of one regiment (Again after some lobbying by Günter!). All of the front line Saxon battalions were covered by chevaux and were allowed to adopt DEFEND orders. King August the Strong was randomly either a Plodder or Competent.


The Swedes had 6 battalions. 3 were Guard and the remainder Elite. They had 12squadrons, all Elite with the exception of the Drabants who were Guard. Three light guns completed the orbat. King Karl XII was either Skilful or Gifted on a random die throw in each run of the scenario.

We played the game four times. The Swedes were dubbed machines, cyborgs (not bjornborgs!), zombies and other descriptive terms indicating their almost unstoppable nature. Despite horrendous losses they made it to the Saxon line in every game and broke into the line three times from four.


Their best performance came in game 2 under Bill Robertson. Bill broke the front line in two places and caused the partial collapse of the second line. Despite this, Gerry and Les ultimately achieved an impressive Saxon victory. Don't feel sorry for Bill! He attacked and attacked and then, attacked again. By the end of the game he was commanding one solitary squadron of Ducker's Regiment and two infantry battalions with over 60% casualties apiece, oh... and Karl was still in there but that was it!


He simply ran out of steam as there were no Swedes left to fight. Bill looked well satisfied as he had shattered several regiments of Saxon cuirassiers and worn the enormous GDC down to two rump squadrons.

Alan made some heavy weather of the Swedish attack in game 3 and the result was judged a losing draw. He got bogged down in the centre and his Horse were checked by wave after wave of Saxon Horse which had moved well out into the flanks. Games 1 and 4 saw Günter in charge of his beloved Saxons. Game one was judged a winning draw as was game 4.


King August managed to fight many rounds of close combat during the four battles surviving them all. He led his GDC is a five round melee which saw him flit from one shattered squadron to the next as Ducker's regiment scythed through each fresh wave of red coated Horse on the Saxon right.


An interesting syndrome developed throughout the weekend which saw each successive commander of the Saxons find Günter (wherever he was in the room or at lunch) and report to him on the performance of his army. He told me he 'felt like the King!' by the end of the two days!

Overall the Saxons performed extremely well albeit fighting from a strong defensive position. The Swedes were admired as unstoppable, awesome, frightening, quick, flexible, hard hitting and devastating (with most combats starting with them on +10 or +12 combat dice versus the +3 to +8 of the Saxons) but.. they did not win once and were shattered in every game.


We found the most effective way of dealing with the Swedes was not the All or Nothing charge but rather; sending the Saxon Horse in squadron by squadron. This slowed and disordered the Swedes  in addition to wearing them down by attrition.

Toggy thought BLB balanced it just right. I was happy too!

The Controversy of Defeat - The Collapse of the Jacobite Left Wing at the Battle of Aughrim, July 12th, 1691 - Part Five

$
0
0
Michael McNally - The question which remains to be answered is quite simply was the Battle of Aughrim lost as a result of the ‘fortunes of war’, of one commander being luckier than his opponent? Or is there a darker element that needs to be considered – was the battle lost through the supposed treachery of one or more Jacobite officers?

Firstly we need to look in greater detail at the composition of the Jacobite left flank itself, its’ commanders and the troops involved. 

Another shot from the LoA game featured at Claymore 2013...
 
In Sir John Gilbert’s edition of “A Light to the Blind”, the formation is described as follows:


On the left the Marquis of St. Ruth placed the earl of Lucan’s regiment of horse, and those of colonel Henry Luttrell, of colonel John Parker, and colonel Nicholas Purcell, with a body of dragoons’ and shortly afterward continues ‘The conduct of this left wing was given to major general Sheldon, the first line of which brigadier Henry Luttrell commanded. Their business was to defend the pass of the causeway, near to which, for added security, there were set two regiments of foot’. 
 

At first reading, the above extract seems quite simple – Sheldon’s forces consisted of four (named) regiments of horse, a force of dragoons (also most probably four in number), with two battalions of foot in Aughrim village – one of which we may reasonably assume to have been that of colonel Walter Bourke, a detachment of which regiment was also sent to occupy the ruins of Aughrim Castle. But even so, it does raise a number of questions:


The first query lies in the role of colonel Nicholas Purcell. It is a matter of record that, after the expedition to Scotland in 1689, his regiment of dragoons was converted into a regiment of horse, or heavy cavalry. And so, one must ask as to whether this officer was actually in command of a brigade of dragoons or, as is quite feasible, was there a grammatical error in the editing of the original manuscript and that – at Aughrim – he was actually the commander of a fourth named regiment of horse. This latter assumption would make more sense as otherwise colonel Henry Luttrell’s station would have been with the first line of the Jacobite heavy cavalry positioned some distance from the front line, and would therefore not have been in a position to influence the activities of the dragoon screen thrown forward to cover the causeway; he could only have done this if he had have actually been in command of the dragoons.


As has been previously discussed, by the time that Mackay launched his attack across the Causeway, the two battalions that had been deployed in Aughrim village had already been withdrawn and re-committed to the main battle line. This, perhaps one of the most critical actions during the battle, immediately compromised the security of the Jacobite Left for, at a stroke, the three mutually supporting lines of troops – the dragoon screen, the Aughrim garrison and the cavalry brigade, became two lines of troop, the second of which was not close enough to offer immediate support to their comrades in the event of a Williamite attack. In effect, this meant that when the enemy troops were reforming after traversing the narrow passage, and were thus at their most vulnerable, Sheldon’s horse would be too far away to decisively intervene. The only other option would have been to have brought them forward into a position where they could support the dragoon screen, but this would have left them stationary within range of the Williamite guns, a perfect target for van Ginkel’s artillery. 
 

For the dragoons, many of their number undoubtedly deployed forward in dismounted skirmish order, the situation would have been unenviable. Having seen the troops march out of Aughrim, they would have been more than aware of the fact that no friendly troops were close enough that could come to their assistance if they were to come under enemy attack, whilst to their front this self-same enemy was clearly reforming his troops for offensive action. For any troops, and many of these troopers were undoubtedly veterans of Derry, the Boyne, Athlone and many other engagements this would have been a daunting prospect indeed, and when the Earl of Oxford’s “Blues”, arguably the most experienced and ably led unit on the battlefield, began their thunderous advance, the dragoons recoiled. 

Whether this retrograde movement was under as a result of a direct order from their commanding officer, whom we presume to have been Henry Luttrell, or simply a natural reaction by lightly armed troops on foot when faced by advancing enemy horse is unclear, but what should be noted is that when the army had reunited at Limerick following the wake of the battle, there was no appeal against the conduct of either Henry Luttrell or indeed that of his superior officer, Dominic Sheldon, who led the left wing cavalry from the field in the wake of Luttrell’s retreating dragoons. Instead Luttrell was damned by posterity for entering into ‘treasonable’ correspondence with the enemy, a correspondence solely evidenced by a letter addressed to him by a Williamite officer of his acquaintance who had written to enquire as to the fate of a number of his compatriots presumed to have been captured by the Jacobites at Aughrim. In fact the point must be stressed that at the end of his court-martial, majority of the tribunal voted for an acquittal, and it solely Tyrconnel, as president of the court, who insisted that he be confined and his commission revoked.


The next point to consider is the relative conduct of the picked detachment of colonel Walter Bourke’s regiment that occupied the ruins of Aughrim Castle with the aim of enfilading any Williamite troops attempting to force a passage across the Causeway. Traditionally their relative ineffectiveness has been excused by the assertion that the troops were equipped with French muskets but supplied with English musket balls, which were of a larger calibre and thus were incompatible with the firearms. On the face of it, this is an unassailable argument, but there are three flaws. Firstly, and after establishing their lodgement at the base of Kilcommodan Hill, Rowe’s ad-hoc brigade are recorded as having entered into a fire-fight with the Jacobite left wing, by implication both the dragoons and the troops in Aughrim Castle. Thus the castle garrison did, at some stage during the battle, open fire upon the enemy. 
 

Secondly, it was the practice – during the period –to transport the lead from which musket balls were made either in the form of sheets or ingots which would then be distributed to the units as required. The reason for this being simply a matter of space as a tonne of lead in sheets or ingots is by far easier to store or transport than a similar weight of lead balls which must themselves be stored in some form of container. Prior to battle the troops would then take the lead and cast their own ammunition, the immediate advantage to this being that if they were to follow a routine, the physical act of being kept busy would leave them less time to worry about the combat ahead. A second advantage would also be to ensure that the troops had the right calibre ammunition for their firearms. 

Thirdly, since Tyrconnel had issued his original commissions on behalf of King James, the Jacobites had been increasingly dependent upon military supplies from France, and this leads to two final questions – firstly with what ammunition wad the remainder of Walter Bourke’s regiment equipped and secondly if the garrison of Aughrim Castle was in fact equipped with the wrong calibre ammunition, then where did it come from as by the summer of 1691 the Jacobites had no access to any of the magazines and arsenals that were under Crown control at the beginning of the war.


This leads us to a number of conclusions:


Firstly, that the collapse of the Jacobite left wing at Aughrim was simply the result of the fortunes of war, and that with the death of St. Ruth, the army was literally ‘headless’ during possibly the most crucial phase of the battle and that whilst both de Tessé and Sarsfield attempted to regain the momentum that had been lost, they were unable to do so, with tragic results. Had the Jacobite commander not have stopped to redeploy the artillery battery it is virtually certain that he would not have met his end at that stage in the battle, but whether he would have survived any later combat can only be a matter of speculation; his character and record have shown that he would have led from the front. 
 

Secondly the withdrawal of the Jacobite left wing dragoons and horse came about as a result of the breakdown in the chain of command that was caused by St. Ruth’s death. Had he not have fallen when he did, the chances are that he would he would have been able to halt the retrograde movement and reinforce his orders before sufficient Williamite troops would have been able to pass across the Causeway, and even without the dragoons – who would have been of negligible value in a cavalry mêlée – he would still have enjoyed a significant local advantage over the leading enemy formations.


Thirdly, given his effective acquittal following his trial by court martial, it is clear that no opprobrium whatsoever had been attached to colonel Henry Luttrell and his subsequent treatment was merely the result of ill-feeling between him and Tyrconnel. Accordingly and irrespective of his undoubted character deficiencies, whatever the grounds were for his murder in 1717, none of his peers – in other words those most affected by the defeat at Aughrim – would seem to have blamed him for his conduct on the day of the battle, and neither should we. 

We would like to thank Michael McNally for contributing to the League of Augsburg blog as a guest author. Most of our readers will recognize Mike as the author of Osprey's The Battle of the Boyne 1690: The Irish Campaign for the English Crown and The Battle of Aughrim 1691. Mike has other Osprey titles in other periods as well, but will have another title in the League of Augsburg period next year in October 2014... Ramilies 1706: Marlborough's Tactical Masterpiece from Osprey Publishing. All text in The Controversy of Defeat series is Copyright 2013 Michael McNally and used with kind permission. 
 

Whisky in the Jar

$
0
0

As I was going' over the Cork and Kerry mountains
I saw Captain Farrell and his money he was counting
I first produced my pistol and I then produced my rapier
I said stand or deliver or the devil he may take ye

David O'Brien - These are the opening words to a traditional Irish folk song made famous by the rock group Thin Lizzy in the 1970’s and sets the scene for this Donnybrook scenario. This scenario should not be confused with a similar titled scenario created by Barry Hilton for Beneath Lily Banners which appeared in Charles Grant’s 2013 Wargames Annual and covers a completely different action. Captain Farrell’s force is taken from the Army Faction but no unit should be better than drilled. Hogan’s force is taken from the Rapparee Faction, the fighting monk should not be used but the weapons cache, bogged down and Irish mist would be suitable for this scenario.
Scenario
Captain Farrell the military paymaster was taking a military pay wagon through the Cork and Kerry mountains when the axle snapped. He has sent off his cavalry to look for a new wagon and is waiting for his infantry escort to catch up with the mounted escort which only leaves 2 units of dragoons for protection. Unfortunately for the captain a well known Rapparee Michael ‘Galloping’ Hogan has spotted him counting out the money and lightly defended and has called out his men to pocket a pretty penny. The map is only a suggestion of the hilly terrain and should obviously be created from what you have in your collection.


Sample Forces
The two forces I've listed below are just a guide and should be altered to fit your collections.
Captain Farrell's Force is taken from the Army Faction list.
Captain Farrell is the force Hero, he has a horse, long sword and brace of pistols.
One broken wagon with three pay chests unloaded beside it.
Two units of 6 drilled dragoons, they have a horse, musket and bayonet and short sword.
Two units of 6 drilled cavalry, they are mounted, have long sword, brace of pistols and carbine.
Two units of 12 recruit infantry, they have a musket, bayonet and short sword.
This force can have 4 drilled characters and 2 recruit characters, I have given the two infantry units a drilled officer and a recruit sergeant. The dragoons have been given a drilled sergeant and a recruit drummer. The cavalry have been given a drilled ensign and a drilled sergeant.

Michael Hogan's force is taken from the Rapparee Faction list but for this scenario I would suggest they are all on foot except for Hogan.
Michael Hogan is the force hero, he is mounted with a long sword and brace of pistols.
One unit of 4 elite men armed with either half pikes, or muskets, or a brace of pistols and short sword, they can all be armed with the same weapon or a mixture.
Two units of 8 drilled infantry armed with half pikes and short swords.
One unit of 8 drilled infantry armed with muskets and short swords.
This force could have 4 characters similar to the army faction but for this scenario I would suggest they use the Kings Man which allows this force to delay use of an army faction card, and the character options such as weapon cache which gives a unit a pistol, bogged down which allows the Rapparee player to place a bog anywhere at the start of a new move and Irish Mist which allows the Hogan player to place a thick bank of fog in front of an enemy unit before it is about to shoot. The fog then obscures the target and they can't be shot that turn.


Deployment
Captain Farrell and his dragoons should all be dismounted at point C on the map at the start of the game and the 3 pay chests have been unloaded from the damaged wagon, they are placed first before any of Hogan's troops are deployed. His two units of cavalry are deployed off table at point B and the two units of infantry are off table at point A, these will only come on once their cards have been drawn. Hogan’s men can be set up anywhere on the table but can’t be any closer than 18” to Farrell or his men and the wagon.


I took all of his money and it was a pretty penny.
I took all of his money and I brought it home to Molly


End of Game
This game only lasts for 15 moves.


Victory Conditions
The winner is side which controls the most money at the end of the game and for Hogan’s side that means he has to get his money to safety at Molly’s chambers in the Thin Lizzy pub.


Special Rules
* Hogan’s force should have either a wagon or some pack horses to carry the money boxes.
* It takes one man a whole move doing nothing else to pick up and load a money box.

* The Rapparees wagon or pack horse should have it's own card and is controlled by whichever 
    player was last in charge of it.
* The textured areas marked on my map should be made up of hills, bogs and rough ground and is
   classed as rough going so cannot be crossed by wagons although a pack horse can.


She swore that she loved me never would she leave me
But the devil take that woman for you know she tricked me easy
Being drunk and weary I went to Molly’s chamber taking my Molly with me
And I never knew the danger for about six or maybe seven, in walked Captain Farrell.
I jumped up, fired off my pistols and I shot him with both barrels.


Optional Rule
This section should only be used if both players agree to it otherwise just use the basic victory conditions. Molly Malone is a well known ‘Fence’ in the streets of Dublin and lots of stolen property and cash has been hidden under her barrow of mussels and cockles for getting disposed of safely. Also unknown to Hogan she has also been having an affair with Captain Farrell. Once Hogan gets to Molly’s chamber he should roll a d6 and add 1 to the dice roll for every money box after the first and go by the result below. If Hogan has killed Captain Farrell during the basic game he should deduct 1 from the dice roll.

1 or 2. Molly drugs his whisky and double crosses Hogan,  
           he ends up in prison for killing Farrell, she keeps the money, so Hogan ends up with nothing.

3 or 4. The result stays the same but he enjoys a good jar of whisky.

5 or 6. Molly manages to double the value of the money, they enjoy a good few jars of whisky
            then run off to the new world with Hogan to start a new life.

Now some men like the fishing and some men like the fowlin',
And some men like ta hear, the cannon ball a roarin'.
Me? I like sleepin' especially in my Molly's chamber.
But here I am in prison, here I am with ball and chain, yeah.


Happy Halloween! Things that go bump in the box file!

$
0
0

Barry Hilton - My preoccupation with all things spooky is a source of amusement to my wargaming  friends but from an early age I have always been interested in ghosts, witches, haunted houses and things that scare me. Recently when clearing out 50 years of family hording from my mother's house I found an old board game from the 1960's called Haunted House which I used to love playing with my pals when I was a nipper. I wonder if any of you remember it? Just proving to myself that some things travel with you throughout your life.


That morbid fascination has continued through Hammer Horror movies, Stephen King novels, Dracula, Frankenstein and other Gothic staples into Zombies, Undead and all sorts of similar nonsense. Suffice it to say my favourite Carry On movie is Carry on Screaming! , Live and Let Die was Roger Moore's finest Bond outing (for me anyway), I love Tim Burton's stuff and I can't get enough of the late Jim Bowen's wonderful 40mm Occult range... I think you have the picture.


Finding a way to include some element of Satanic nonsense in my wargaming is a sub-plot which runs and runs. The discovery in Antwerp last year of information relating to the Bokkenrijders was a little notch on the old magic wand! Incorporating these ghouls into Donnybrook didn't take to much work even convincing Mr Harrison to be complicit and indulge my weaknesses!


Donnybrook is nearly there now, a nice Wargames Illustrated feature on the Bokkenrijders is in the can and my themed game at Crisis 2013 is all about those scary Bokkenrijder - Goat Cavalry chaps.. so Happy Halloween to all of you out there and I hope you never need to suppress your interest in the slightly less mainstream avenues of the wargaming map just to save you from embarrassment!

DERBY DEBRIEF: Central Highlands of Scotland, 1689

$
0
0
Mackay's army crosses into hostile territory from the left.

Barry Hilton - This scenario was constructed around the core of Mackay's and Dundee's armies at Killiecrankie. I wanted to give the players a chance to experience the extreme terrain of the Highlands and the novelty of dealing with Highlanders. As Jim Masson was attending the weekend and he had been very creative with his use of Warfare Miniatures in his Jacobite Scots army I looked for an opportunity to roster Jim's fine collection in the orbat.

This table was the smallest of the four games at 8 x 6 feet. It was dominated by an enormous steep hillside which quartered all movement up and down and disordered any units on the slope. In the end it created a formidable physical obstacle which was to prove very difficult for both sides during each game. The swift running Highland river was passable only at the bridge and at a ford further upstream.


The small village was classed as a 1B settlement with a garrison comprising a detachment of Jacobite grenadiers. On the steep back slope of the hill Purcell's Irish Brigade was positioned out of sight and not placed on the table. In the woods either side of the table two clans were concealed on Mackay's right and one on his left. The Williamites diced each turn from T1 to determine whether they spotted movement in each location although the players had no idea why they were dicing! The score needed started at 12 on 2 x D6 on T1 reducing by 1 per turn unless the Jacobite commander voluntarily decided to move the clans who would then become immediately visible. Concealed movement  of  Purcell's brigade was communicated to and tracked by the umpire.


The scenario was predicated on Mackay trying to finish Jacobite resistance in Scotland and the Jacobites attempting to lure Mackay into a trap and massacre his force. Mackay began games 1-3 with his own brigade on the hostile side of the river and his cavalry half across and forming up.


In the first three games Mackay's brigade needed to take out the grenadiers in the village in order to clear ground for an attack.  The garrison performed very well in all games although in each they were destroyed or routed. The disruption caused by a  single stand unit as a garrison was impressive.


The Highlanders were unpredictable. They charged several times. Ramsay's withstood a charge and broke the Cameron's in combat in one game. They volleyed off a charge by Clanranald in another game. The most spectacular success they achieved was when the Stewarts of Appin braved a volley and smashed into Hasting's Regiment in game 3. They cut down and destroyed the Englishmen and caused a real stutter in the Williamite advance. I believe Adam Hayes commanded the Jacobites in this game and Gerry may have been the Williamite general.


The Horse on both sides were not hugely effective. The regiment of Huguenot cavalry did, during the first game manage to execute a flanking manoeuvre and make it to the top of the hill only to be driven away by volleys from the up until that point hidden Irish Brigade.


The Williamite force gained victory in  in game 1 by comtrolling the battlefield and manoeuvring the Jacobites into a strategic withdrawal. Game 2 saw the Williamite attack checkmated by poor dice throws and cards. Game 3 was judged a Jacobite win and Game 4 a Williamite one.


On the final run of the game as we were a little pushed for time we began with the English Brigade atop the plateau and facing both Dumbarton's and Purcell's brigades whilst the Highlanders attacked Mackay's brigade in the valley. The village was already assumed to have fallen to the Williamites by then.

Players commented that this was a particularly tricky scenario. The terrain was frustrating, the Highlanders were a problem for both their own side and the enemy.

Viewing all 1158 articles
Browse latest View live